Showing posts with label false eyelashes. Show all posts

Tuesday, December 17, 2013

PAINT IT BLACK: MAKE UP TIPS AND TRICKS FOR FEMME FATALES


May favorite onstage look: dramatic, lush-lashed coal black eyes and over-lined lips


 We all know how the classic Little Black Dress is always an elegant but extremely sex-aaaay wardrobe choice, right? Well, for a really arresting look for the stage or Holiday parties, there’s no way you can go wrong with black make up. Black eye make up is every bit as timeless as The Little Black Dress. Alluring and exotic, it has been used for centuries, from the application of   kohl eyeliner in ancient Egypt  (which was allegedly Cleopatra’s secret weapon of seduction) to modern times. Velvety black eye make up calls to mind the smoldering intensity of 1920’s silent film stars and legendary vamps like Mata Hari…as well as the bad-girl sassiness of early 1960’s girl groups like The Ronnettes. In the 1970’s, lush liner and thick false eyelashes adorned the lids of everyone from Raquel Welch to the stars of Valley Of The Dolls. More recently, starlets like Kristen Stewart and Taylor Momsen have rocked pitch black eyes to great affect.

 The key to beautiful black eyes is shading. If you get very graphic with your application, you’ll wind up looking too Goth- and unless that’s your intention, you need to make sure that you blend your black eye make up carefully, which will soften it up a bit, but still retain the intensity. 
Metallic smoky make up in shades of black, silver & white

When I use black shadow, I always prefer a pearly or iridescent shade, because when water is added, it magnifies the color. A matte shade doesn’t work this way; it can’t be made wet because it will just look muddy.   Also, any type of pearly or iridescent eye shadow will work, even drug store brands. I prefer using Nars Nightbreed (a gorgeous black shadow flecked with tiny specks of silver glitter) but Urban Decay and even Wet And Wild both have a black pearly, sparkly shadow that works almost as as well!

First, I apply the shadow dry, all over the lid with a small brush, really working it well into the roots of lashes. Next, I brush upwards, into and above the crease in my eye, blending it well, and sort of swooshing the outer corner of the eyelid upwards and outwards. Then I line the bottom lid with the same dry shadow, and bring it up at the outermost corner to meet the top lid’s extension, so that it creates an inverted sideways  “V” shape.  After that, I go over the lid with a soft brush full of the black shadow that I carefully wet then pinch dry before applying to the top lid and just barely above the crease. It will be layered over the dry shadow, creating a smudged, smoky effect.
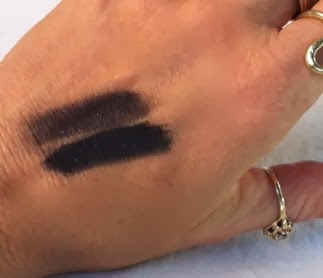
Pearly black shadow dry, and intensified by wetting it

 Next, I add on thick lashes to the top lid, then line the top and bottom lids with MAC’s Blacktrack gel liner, though a soft black pencil would probably work just as well. After the liner has dried-or just after the pencil application-I go over the liner with a small, soft brush loaded with the dry iridescent shadow. This diffuses the harsh line and makes it softer and thicker. Finish this look up with a pearly white powder shadow highlight just under the eyebrow at the outside corner, and you’ll be good to go!  For a bit of glitz, lightly dip your dry fingertip into a pot of MAC’s Reflects Pearl cosmetic glitter, and pat it on carefully to the white highlighted area. Because the glitter is applied dry, it will “migrate” just a little, adding a touch of sparkle, which will show up under any sort of lighting.  This looks terrific either onstage or for Real Life.  The reason I love this particular glitter so damn much is because it is so highly reflective…it’s truly my favorite glitter ever. The individual flecks are large enough to really catch the light, but not too big, so they don’t give you that over-the-top Hot Mess At A Club look. I’m not being facetious when I tell you that I (seriously!) have a container of Reflects Pearl in my earthquake kit…cause if there’s a Global Apocalypse, I want to look good!

Teal shadow by itself, and  mixed with black

Red shadow by itself,and mixed with black
Still another way to use black eye shadow is to mix it in with other brighter colors. This will tone the colors down a bit, but they’ll retain their richness and make them more complex.  I like to mix black pearly shadow into emerald green, dark blue, teal and even red. Red eye shadow on it’s own will look crazy and garish, sickly or clown-like… trust me, you do not want to use it on it’s own!  But mixed with black, it’ll create a soft burgundy color that creates a sophisticated smoky eye look. Words to the wise- don’t get the red shadow close to the lash line. It can cause eye irritation in some individuals. When you mix the red and black shadows, stipple in the red above your eye crease, and blend it onto the outside corner wing.

 You can even use black on the lips- sounds crazy, I know, but it looks incredible!  Think of Tim Curry, as Doctor Frankenfurter in The Rocky Horror Show, but you’ll definitely want to go a little less extreme. What you’re after is a sculpted, kissable look. Apply the red lipstick first… and use a nice red with blue- as opposed to orange- undertones. 


This looks amazing on every skin tone from the ghostliest pale to richest brown; not only that, the blue tones in the red will make your teeth appear brilliant white! Blot the lipstick just a little, then take a soft black pencil and line the outside of your lips. Shade in the corners of your mouth, too. Then apply another coat of the red, and if you need to, smudge and blend the black into your lips with a lip brush or your finger.  For a party, apply a little bit of clear gloss only to the bottom lip at the center for a bee-stung look.  If you’re going to wear this look onstage, forego the gloss and use a small dot of pearly white, light pink or even gold eye shadow to create the same illusion.

 Remember, cosmetics are the most instantaneous and temporary changes we can make to our appearance, so don’t be scared, just take an hour or two to experiment and have fun playing!


 For more make up  tips and tricks, try my  instructional  DVD 
“Bombshell: Dramatic  Make Up For The Stage, Photos And Glamourous Occasions” available here:


Thursday, July 18, 2013

WHAT THE &%@*$# ARE YOU PUTTING ON YOUR FACE?


 Here’s a dirty little secret
Did you know that most of your cosmetics and beauty tools  come with expiration dates? If you’re wondering why your face is breaking out constantly, why you are prone to eye infections  or  why a certain cream, powder or gel irritates your face, old beauty products just might be the culprit.

This is a list of commonly used beauty products and their life expectancy:


  FACE

 MASCARA AND  LIQUID, GEL  OR CAKE  EYELINER
 These products are good for three months, tops- because the mascara  or eyeliner is is wet and gets “contaminated” every time the brush goes into the tube then onto your eye and back into the tube, it  literally becomes a breeding ground for bacteria! You wouldn’t put the contents of a Petri dish on your eyes, right? Well,  that’s exactly what you’re doing  every time you use an out-dated liquid, gel or cream eye product!

I date all of mine with a Sharpie and toss them after three months.  Sure, it gets expensive….but  eye doctor appointments are even more expensive!

And please don’t ever  lend these products to anyone, even your bestie.

 EYELASH GLUE AND ADHESIVE
 If you keep the cap on tightly and store the glue in a cool, dark place, you could probably keep the glue up to  six months… but again- this stuff goes on your eyes! You can never be too careful. If it smells fishy or like bleach, get rid of it pronto!

FALSE EYELASHES
 Yes, darling, they can be re-used!   I’ve had some sets of lashes for months- they just need to be cared for properly. After each use, I pick the remaining glue off the band of the lash, then swab it with a Q-tip full of alcohol to kill any bugs or germs before storing the lashes in their original container, set into the tray they came in, so that they retain their shape.


  EYE AND LIP PENCILS AND CRAYONS
Eye and lip pencils  will last up to a year if  you care for them correctly. Make sure to sharpen the pencils  before every use- or at least once a week -to prevent  transferring bacteria to your eyes or mouth.  If you notice a textural or color change- particularly a weird white coloring at the tip of the pencil, get rid of it stat!


LIQUID OR  CREAM FOUNDATION , CONCEALERS AND CREAM BLUSH
Three to six months, depending on whether you use your ( clean) fingers,  or  a disposeable sponge to  apply it. Every time the sponge touches your face, it is transferring bacteria from your skin  right back to the product. Make sure to keep all of these containers tightly sealed, and stored in a cool, dry place.
 Definitely discard any liquid foundations that have separated, or any creamy make up item that smells funny.

POWDER EYESHADOW , FINISHING POWDER AND POWDER BLUSH
 Generally speaking, these products have a “life expectancy” of two years. You could probably use them a little beyond that, but the  texture will be different- older powders  will be more flakey and dry, and the color may be a little off.

LIPSTICK AND LIP GLOSS
 Lipstick can last up to two years, if  you take care of it properly.  Some gals like to store it in the refrigerator in the summer, to prevent melting and breakage.  Throw your lipsticks away if they smell icky or become discolored.  You can make an older lipstick “new” again  by slicing off the tip with a knife.  As for lip glosses, they will last up to a year- again, it’s the concept of liquid/gel as a breeding ground for  bugs and bacteria.

 SKIN CARE PRODUCTS AND FACE CREAMS
 Most over the counter skin care products  will last about six months to a year, though  if you’re an anti-aging slut ( like me!)  you’ll use them up way before there’s an expiration issue!
Any  products  that are  organic, "all natural", or those containing antioxidants ( like Vitamin E or C ) or those with  retinals  should definitely be stored away from sunlight. Again, if  your skin care creams  smell funky  or have gotten separated, lumpy or  thinner, just to be safe... throw them away!

MAKE UP BRUSHES AND COSMETIC SPONGES
Bacteria and sebaceous oils  can easily get  trapped in  make up sponges and brushes… which is bad for your tools and  even worse for your skin!
 I wash all my brushes at least once every two weeks in tepid water with mild soap or baby shampoo. To dry,  lay brushes flat on a soft, clean towel  so the bristles don't break or lose their shape. If you care for your brushes well,  they can last for years!
 Toss cosmetic sponges roughly once every month or so, or any time you notice them cracking or flaking.  Better yet, invest in the disposable kind!


  HAIR

BLOW DRYERS
 A  good blow dryer ought to last at the very least one to seven  years, depending on the make of the dryer, how often-or carelessly- you use it, if it is dropped, gets hair clogged in the vents, etc.

FLAT IRONS
 One to four years depending on use; the ceramic plates  and heating elements  on the flat iron are usually the first thing to go.

 HAIR BRUSHES
A good hairbrush can last for years- even a cheap one can- it just depends on how  you maintain it.  Make sure  to clean your brush regularly, by removing the hair from it, and swishing it around in a bath of hot water and mild detergent, then letting it dry naturally, before using it.


 MISCELLANEOUS

 MAKE UP REMOVERS
 Usually, these products are used up too quickly to go bad- but if you’ve opened a product , had it for a few months and it smells odd, do a little patch test on your wrist or inner elbow  to check for irritation before using it on your face!
As for make up wipes and towellettes, the liquid product in the package can tend to dry up rather quickly… say, two months. In order to keep mine fresh,  every time I use a wipe, I put the package back on the shelf in a different position- right side up, upside down or on it’s side- this will ensure that the towellettes stay saturated  with the remover product and easy-to-use.

HAND  AND BODY LOTION
 Since we tend to use an awful lot of these and they’re relatively inexpensive, expiration is not usually an issue.  Sealed in the container, they will last  about a year. After being opened, you’ll probably use the product up fairly quickly. But if you’ve had the lotion  for about six months, or it begins to smell off, get rid of  any unused portion.

SUNSCREEN
 Most sunscreens last for two to three years, and, unlike "regular" cosmetics,  many have an expiration date  printed right on the tube or bottle! This means that you can use them from one season into the next-yay! I always date my sunscreen with a sharpie pen, just to make sure I’m getting full coverage.

NAIL POLISH
 Though bacteria won’t really last -or reproduce-in nail polish because it’s a “hostile environment”, the polish itself  may lose color, separate or become gummy and tacky over time.  Most nail polishes have a shelf-life of about two years. They won’t harm you if they expire, but they may not go on well or look their best.


Monday, February 4, 2013

DRUG STORE COWGIRL: TWELVE INEXPENSIVE BEAUTY PRODUCTS THAT JUST MIGHT CHANGE YOUR LIFE


 These days, cosmetic science is evolving almost as fast as electronic science- there are so many innovative and inexpensive products coming out on the market it’s hard to keep up with them! Happily, that means that a hefty price tag is no longer a prerequisite for a great beauty product.  Just in case it's not entirely obvious, I'm an absolute  make up fanatic, and one of my favorite...er...hobbies is looking for inexpensive cosmetics  that perform well  on or off stage!
 Here are some of my favorite drug store cosmetics, all of which are more than worth their price, and widely available. 

 EYES

Revlon Precision Lash Adhesive
  I can’t rave enough about this fantastic product! It’s one of the best discoveries I’ve made in the past year, I am totally addicted! The main reason most chicks have a problem applying their falsies is because they put the glue on and don’t wait for it to get tacky enough to set on the lash. But you won’t have that problem with Lash Precision-it’s perfect for those who are not experienced with applying false eyelashes- or those in a rush on their way to a show- because the moment you apply the glue, it’s tacky enough to put the lash directly onto your eye with no wait time whatsoever!  This little gem comes in clear or black glue, and features a fine-tipped brush applicator, which will enable you to paint the glue onto the lash with no messy drips. The formula is also   great for those with Latex sensitivity- no more swollen weepy eyes! A godsend for newbies and make up addicts alike!


Wet N Wild Color Icon Eye Shadow Palettes
 Through out the years, Wet N Wild has offered a great selection of cosmetics for the budget-minded, but these new palettes are just incredible! An absolute steal at under seven bucks a pop, the palettes feature either four or eight trays of lush, hyper-pigmented frosty color, which means you can use them wet or dry. Seriously, the quality of these eye shadows are comparable to Mac or Nars! And the little purse-sized palettes mean they are perfectly transportable in dancer’s gig bag. Two of my fave collections are  “Blue Had Me At Hello” ( some of the shades are pictured on my eye, above) an eight-shadow palette with frosty white, metallic silver, pearlescent teal, minty aqua, royal blue, navy, flat black and black with silver glitter;  and  “I’m Getting Sunburned”, a four-pack with a beautiful blue/pink, a metallic bronze, dark brown with copper glitter and rich black. 

Ardell Double Up Lashes
Some of you might remember a post I did a while ago on double stacking lashes…well, these come that way already!  They have a full, thick and slightly uneven look that makes their appearance a little more “natural”… well… not really, but that’s why we use them, right?  Anyway, these’d be terrific for use onstage or just for a glam night on the town- and they go for $3.99-$5.99 depending on where you buy them. Use them with the Lash Precision glue!

 L’Oreal Paris Telescopic Shocking Extension Mascara
This stuff really works!  You’ll ridiculously get long, thick, luxurious lashes with just a few swipes of the wand. The fibers in it somehow don’t clump into scary Tammy Faye Bakker lashes, either. I was blessed with a lot of things, but beautiful eyelashes just wasn’t one of them…when I use this mascara, you’d never know! Try it, you’ll become devoted.

Physicians Formula Shimmer Strips
 Custom Eye Enhancing Shadow And Liner 
Another handy palette, these eye assortments comes in a cute box trimmed with black lace, and creates perfect, dimensional ombre smoky eyes…of any color. Some are intended for certain eye colors, such as green or hazel, but the Nude palette, a mix of matte and pearly colors, would be terrific on anyone. Under ten bucks, and considerably less depending on where you shop.

 Urban Decay  Glitter Liner
 By far the most sparkly and stay-put glitter liners on the market.  Unlike other brands that barely leave a trace, the Urban Decay Glitter Liners are packed with color and glitter, so they really shine and twinkle when you’re onstage. They look great on their own with a couple of coats, but for extra drama, layer them over eye shadow of the same tone, like bronze on bronze, turquoise on top of teal- you get the idea. They come in eleven different colors, and all of them look like a serious explosion of bling!


LIPS

Revlon’s Just Bitten Kissable Balm Stain
A super-fantastic cross between lip balm and lipstick, this product slides on easily and precisely, and it is shaped like a chunky crayon with a pointed tip that doesn’t need to be sharpened. The candy-like colors stay put for ages, and have a nice moist sheen, but are not gloppy at all.  There’s a huge array of shades- the one I use the most right now is  # 040, a punchy perfect coral that is not chalky-looking or old lady-ish at all.


 Burt’s Bees Tinted Lip Balm
 I’m sure you’re already extremely familiar with Burt’s Bees incredible line of skin care and cosmetics…but their tinted lip balms are the bomb! They’re perfect for any season- great for winter, because the 100% natural botanical waxes and shea butter condition your lips as they add a pretty color, while being light enough for summer, with shimmering sheer shades that don’t look too over done, and aren’t messy even if you apply the balm a little haphazardly. Available in nine shades, at about seven bucks apiece, my favorite shade is Red Dahlia.


  SKIN

Maybelline Dream Fresh BB Cream
  The new buzzword in cosmetics is BB...and if you’re wondering what the heck a BB is, the initials  stand for Beauty Balm, which is a multi-purpose product that provides skin care and coverage.   Beauty Balms mask imperfections like a foundation, but they are lighter and don’t cake up.  They hydrate and brighten the skin, while providing a sunscreen.
 In other words, how did we ever live without them? 
Maybelline Dream BB Cream is hands-down the best BB I’ve tried yet- and I’ve tried a lot of them.  It glides onto the skin, provides coverage for redness and zits, and it looks dewy and fresh. Plus, Maybelline’s version has five shades, while most BB creams only offer two or three.  While it’s too sheer to use onstage, I highly recommend this stuff for real life, especially on those days when you’re running out to a dance class, but don’t wanna look like a hag!

 Urban Decay Afterglow Glide On Cheek Tint
 I was never really a fan of creamy cheek color; I much preferred powder until I tried this nifty stuff.  The formula is silky and glides on evenly whether you’re putting it on bare skin or over foundation or a BB cream.  Because the tints are sheer and natural looking, you can build the color up to increase the color value. Yummy.  

Boots No.7 Photo Fix Primer
Finally! An inexpensive primer that allows your foundation to slide on easily and faultlessly.  I love this stuff: it’s light and doesn’t feel greasy, in fact it’s barely noticeable, but it also seems to “fill in” problem areas like smile lines or crow’s feet without looking cakey at all.

Lumene Pure radiance Day Cream SPF15
I discovered Lumene products in Finland in 2011, and I just adored them.  On that trip, I started stressing about how I was going to get more, but wouldn’t ya know that the moment I got home, they became available in the USA?  Cool! Their products are natural, mostly made with Arctic Cloudberry. I’m not entirely sure what exactly that is, but let me tell you, all their stuff feels amazing on your face!  Aside from this emollient cream, they make a variety of facial washes, toners, and eye creams, and every single item I have tried just rocks! Super affordable and wildly repairing.  Go for it!

Monday, February 27, 2012

TOTALLY STACKED!


Once you start using false eyelashes on a regular basis as part of your stage make up, you’ll never look back! If there’s one product I couldn’t live without for stage shows, hands-down it’s false eyelashes. They make even the smallest eyes look huge, expressive, and super-sexy, and they lend an exotic, lovely doe-eyed look to anyone- of any age- who wears them.

I’m so addicted to my faux lashes, that every time I take them off after a show, I get a sad little hollow feeling in the pit of my stomach…and then when I put them on again for my next show, I heave a sigh of heartfelt relief and think to myself,

“ Now…there’s the face I know and love!”

There’s only one thing that’s better than wearing a great set of false eyelashes…and that’s stacking your lashes…wearing two sets at a time!

Stacking your lashes creates a really gorgeous look, and also appears a bit more dimensional and alluring than just one set of thick lashes, because the lashes have a bit more texture from the stacking, with all the individual hairs appearing very slightly uneven...and spectacular!

Stacking eyelashes can be done in many combinations, for a variety of different looks. You can easily stack two pairs of lashes that are the same size and thickness; use two short-ish pairs of lashes for a pumped up “natural” look (yeah, right!) Or use two longer, thicker pairs to recreate a really incredible late 1960’s-early 1970’s look, very “Valley Of The Dolls” and vixen-ish.

You can also stack a set of thicker and shorter lashes with a set of longer, wispier lashes, for an exotic effect. In this case, I’d stack the lashes with the longer lashes underneath the shorter pair, so you get the depth, lushness around the eye while the longer lashes flutter up delicately towards your eyebrow every time you bat those peepers!

If you are using fantasy lashes, such as any sort of the popular colored lashes that are available today, or those made from metallic Mylar, you may want to stack your lashes with a black or dark brown set beneath the fantasy lash, so that you get the crazy pop of color but still have a luxurious, dark frame of lashes around the eye itself.


Still another option is to just stack a portion of your lashes, using one full-band false eyelash for each eye, and then use a half or quarter of another lash, stacked only at the outside corner, for a cat-like flare or wing. Or, you can place just a few longer lashes directly in the middle of the eye, where the iris is when you look straight ahead. For these looks, I save the trimmings from every set of eyelashes I cut apart… and if you are an eyelash newbie and don’t know what I mean by this, keep on reading- it’ll be clear in a minute!

To stack your lashes, the first thing you will need to do is get two sets of eyelashes, and make sure to have a couple of extra pairs on hand also, in case you don’t get the hang of stacking right away.

Next, have a look at your lashes, and determine which are for the left eye, and which are for the right. Yes, eyelashes are made differently, with the smaller, shorter hairs meant for the inside corner of the eye. Next, trim each lash (at the outside or longer end) to fit your eyes. Some of us have narrow, almond-shaped eyes; others have eyes that are slightly rounder or extremely round in shape. False lashes are meant for everyone, so most are too long (on purpose) length-wise.

After you’ve trimmed the lashes, apply a thin band of glue to the base of the first set of lashes you’re using, and let it sit for at least 30 seconds – sometimes it might even be more like a full minute - until glue is tacky. The brand of the glue, the amount you put on the lash itself, or even the climate you’re in will determine how quickly the glue dries. I still remember one time when I was performing in Miami, and it was so humid, even in my air conditioned dressing room, that I thought the glue was never going to dry… and I was horrified to think I’d have to go on stage wearing only mascara!


One of the main reasons most gals have a problem with applying false eyelashes is that they try to stick the lashes on when they are too wet, which can result in slippage, or worse- actually gluing your eyelids together! This won’t hurt you or injure your eyes, it’ll just be a huge mess to clean up- you’ll probably have to clean everything off and start over. The other reason is that your false lashes may be too long for your eye-bed, so make sure to trim the lashes, and save the part you cut for future stacking.

As far as glue goes, I recommend using "DUO" glue in clear/white, it’s my favorite because it holds well and is the least irritating of any brand I've used. I also believe that using clear glue is better, because it dries invisibly…but many people prefer the dark-toned glue. If you use the dark-toned glue, it can make mistakes look very obvious, whereas the clear glue dries invisibly.

But no matter which type or color of glue you use, let the glue sit on the faux lashes and get pretty tacky, otherwise you may have a messy mishap! In fact, I think that the reason most women think falsies are difficult to apply is simply because they don’t let the glue set long enough!

When you are ready to apply your first set of lashes, sit them one at a time on your upper eyelids, just above your natural lash-line. Press down lightly in the middle first, and then tap the lash down lightly towards inner and outer corners. I do this with my fingers, but many make up artists use soft orangewood sticks -like the type you’d use to push back your cuticles- or even the (clean) end of a make up brush. After the lash is firmly in place, keep your eye closed for a moment, to let the glue take hold.

Now, it’s time to apply the second set of lashes. Whether you are using a full banded lash or just a portion of a lash at the outer edge, simply place your second set of lashes directly on top of the first pair- it’s that easy!

Some people prefer to stack the lashes first, and then apply the stacked set to the eyes, but I’ve found that I can get an easier and more accurate placement by stacking the lashes directly onto my eye.

When you want to remove the lashes, nine times out of ten, they will come off together, as one unit. Clean them by removing the dried glue, by picking it off with your finger, and then swabbing the lash with a Q-tip soaked in a bit of alcohol. Lay them in their case, and you’ll have a flirty stacked set all ready to use the next time you want to put them on…which I can assure you, will probably be for your very next event!


For detailed instruction on applying false eyelashes and creating a number of beautiful, exotic looks, check out my new DVD "Bombshell: Dramatic Make Up For The Stage, Photos And Glamourous Occasions With Princess Farhana & Devilla.

To see the "Bombshell" promo trailer, go to: http://www.youtube.com/watch?v=MvjR_bS9_xw


To order "Bomsbshell", go to: http://www.princessfarhana.com/video_bombshell.htm


Photo by Dusti Cunningham