Showing posts with label beauty. Show all posts

Sunday, January 5, 2014

GOING GREEN IN 2014


If you want to start the New Year off in a healthy way, the best thing you can do for yourself is to drink green juice.  At the risk of sounding like a preachy health nut, I gotta say that this practice  has really changed my life...and my body!

 I make my own and drink it every day. Drinking the homemade juice concoction  and staying well hydrated with water will  supply you with much-needed nutrients and antioxidants, make your skin glow with health, give you boundless energy and shiny hair, keep your muscles and tendons supple and dance-ready.

 Bottled green juice is available almost everywhere, but it’s expensive…and some brands masquerade as “healthy” but they’re actually loaded with sugar, and all the natural fiber of the veggies is lacking too. When I make my own juice, I don’t use a juicer. While these gadgets are great, I like to make a chunky smoothie because it  retains the nutrients and fiber of the fruits and veggies I mix into the batch. Not only that, many of them  are impossible to clean!

 I use a Nutri-Bullet ( my new favorite toy!)  which is a power mixer that has two different sized cups –including to-go tops- and two different blades as well. It’s super easy to clean, and once you’ve blended your smoothie you can pop on the to-go lid and head out to dance class.  If you don’t own a Nutri-Bullet,  don’t let that stop you! A regular blender will do just fine.  I used one for years, it’s just a little harder to clean and you have to churn it longer than the Nutri-Bullet.  But hey, it’ll serve it’s purpose.

 The juice recipe I’m about to give you will turn a sickly, almost fluorescent shade of green, but man oh man does it taste good! The texture is silky from the  banana, refreshing from the cucumber and celery, and sweet from the fruit.  It doesn’t in any way, shape of form taste bitter or “Good For You”, i.e. Gag Worthy.

 Here’s what you put your the blender- this makes enough juice/smoothie to drink all day long!

1/2  banana

 3 or 4 large handfuls of fresh kale

2 or 3 large handfuls of fresh spinach

½  small or medium sized zucchnini

¼  cucumber ( if the skin is waxed, peel it or cut it away)

 2 or 3 broccoli florets

 1 stalk celery, de-stringed

 ½ a medium sized  apple, cut into chunks

 1  small handful of  fresh or frozen pineapple chunks ( or about ¼ can of canned pineapple )

  Mix in  about a cup and a half of water…or water  mixed with  fresh or  store-bought orange juice, brewed and cooled green tea, or even almond milk or coconut water- your choice!

 Sometimes I add ( or substitute) fresh or frozen berries, orange or tangerine segments, chunks of mango or peaches. Once in a while, I’ll use a dollop or two  of Greek yoghurt.

You can also put a tablespoon of protein or greens powder into it- or both… or add chia seeds, flax seeds or ground cinnamon, they all have anti-oxidant properties!

 Blend well, drink up, and be well!

##


Design by Maharet Christina Hughes, Foreword by Artemis Mourat

 My new book, “The Belly Dance Handbook” will go on sale on January 11, 2014! 

 You can find it on www.amazon.com or get a signed  copy on www.princessfarhana.com

  Here's what's been said:

No matter what style of belly dance you do, or if you didn't know there is more than one style, you need this book in your arsenal. Everyone will learn from this world-renowned dance master's experiences. After all, not just anyone earns the title Princess!

 -Kajira Djoumahna, author of The Tribal Bible

Princess Farhana entertainingly brings you everything (really everything!) you need to know about navigating the treacherous waters of becoming a professional dancer…or a consummately polished performer. Sew a secret compartment in your dance bag for Princess Farhana’s gem of a book, and take control of your destiny!

-Marta Schill, author of The Compleat Belly Dancer

 Princess Farhana brings us all closer to the dancers we would like to somehow become, the dancers we want to grow up to be. She is absolutely glittering, shimmering and pulsating with life – which is what you want in a dancer, a teacher, an artist, a friend, a mentor, and a force of nature.

-Margaret Cho, comedian, actor, dancer


Tuesday, December 17, 2013

PAINT IT BLACK: MAKE UP TIPS AND TRICKS FOR FEMME FATALES


May favorite onstage look: dramatic, lush-lashed coal black eyes and over-lined lips


 We all know how the classic Little Black Dress is always an elegant but extremely sex-aaaay wardrobe choice, right? Well, for a really arresting look for the stage or Holiday parties, there’s no way you can go wrong with black make up. Black eye make up is every bit as timeless as The Little Black Dress. Alluring and exotic, it has been used for centuries, from the application of   kohl eyeliner in ancient Egypt  (which was allegedly Cleopatra’s secret weapon of seduction) to modern times. Velvety black eye make up calls to mind the smoldering intensity of 1920’s silent film stars and legendary vamps like Mata Hari…as well as the bad-girl sassiness of early 1960’s girl groups like The Ronnettes. In the 1970’s, lush liner and thick false eyelashes adorned the lids of everyone from Raquel Welch to the stars of Valley Of The Dolls. More recently, starlets like Kristen Stewart and Taylor Momsen have rocked pitch black eyes to great affect.

 The key to beautiful black eyes is shading. If you get very graphic with your application, you’ll wind up looking too Goth- and unless that’s your intention, you need to make sure that you blend your black eye make up carefully, which will soften it up a bit, but still retain the intensity. 
Metallic smoky make up in shades of black, silver & white

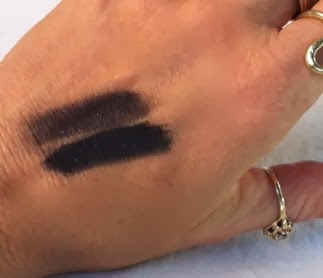
When I use black shadow, I always prefer a pearly or iridescent shade, because when water is added, it magnifies the color. A matte shade doesn’t work this way; it can’t be made wet because it will just look muddy.   Also, any type of pearly or iridescent eye shadow will work, even drug store brands. I prefer using Nars Nightbreed (a gorgeous black shadow flecked with tiny specks of silver glitter) but Urban Decay and even Wet And Wild both have a black pearly, sparkly shadow that works almost as as well!

First, I apply the shadow dry, all over the lid with a small brush, really working it well into the roots of lashes. Next, I brush upwards, into and above the crease in my eye, blending it well, and sort of swooshing the outer corner of the eyelid upwards and outwards. Then I line the bottom lid with the same dry shadow, and bring it up at the outermost corner to meet the top lid’s extension, so that it creates an inverted sideways  “V” shape.  After that, I go over the lid with a soft brush full of the black shadow that I carefully wet then pinch dry before applying to the top lid and just barely above the crease. It will be layered over the dry shadow, creating a smudged, smoky effect.
Pearly black shadow dry, and intensified by wetting it

 Next, I add on thick lashes to the top lid, then line the top and bottom lids with MAC’s Blacktrack gel liner, though a soft black pencil would probably work just as well. After the liner has dried-or just after the pencil application-I go over the liner with a small, soft brush loaded with the dry iridescent shadow. This diffuses the harsh line and makes it softer and thicker. Finish this look up with a pearly white powder shadow highlight just under the eyebrow at the outside corner, and you’ll be good to go!  For a bit of glitz, lightly dip your dry fingertip into a pot of MAC’s Reflects Pearl cosmetic glitter, and pat it on carefully to the white highlighted area. Because the glitter is applied dry, it will “migrate” just a little, adding a touch of sparkle, which will show up under any sort of lighting.  This looks terrific either onstage or for Real Life.  The reason I love this particular glitter so damn much is because it is so highly reflective…it’s truly my favorite glitter ever. The individual flecks are large enough to really catch the light, but not too big, so they don’t give you that over-the-top Hot Mess At A Club look. I’m not being facetious when I tell you that I (seriously!) have a container of Reflects Pearl in my earthquake kit…cause if there’s a Global Apocalypse, I want to look good!

Teal shadow by itself, and  mixed with black

Red shadow by itself,and mixed with black
Still another way to use black eye shadow is to mix it in with other brighter colors. This will tone the colors down a bit, but they’ll retain their richness and make them more complex.  I like to mix black pearly shadow into emerald green, dark blue, teal and even red. Red eye shadow on it’s own will look crazy and garish, sickly or clown-like… trust me, you do not want to use it on it’s own!  But mixed with black, it’ll create a soft burgundy color that creates a sophisticated smoky eye look. Words to the wise- don’t get the red shadow close to the lash line. It can cause eye irritation in some individuals. When you mix the red and black shadows, stipple in the red above your eye crease, and blend it onto the outside corner wing.

 You can even use black on the lips- sounds crazy, I know, but it looks incredible!  Think of Tim Curry, as Doctor Frankenfurter in The Rocky Horror Show, but you’ll definitely want to go a little less extreme. What you’re after is a sculpted, kissable look. Apply the red lipstick first… and use a nice red with blue- as opposed to orange- undertones. 


This looks amazing on every skin tone from the ghostliest pale to richest brown; not only that, the blue tones in the red will make your teeth appear brilliant white! Blot the lipstick just a little, then take a soft black pencil and line the outside of your lips. Shade in the corners of your mouth, too. Then apply another coat of the red, and if you need to, smudge and blend the black into your lips with a lip brush or your finger.  For a party, apply a little bit of clear gloss only to the bottom lip at the center for a bee-stung look.  If you’re going to wear this look onstage, forego the gloss and use a small dot of pearly white, light pink or even gold eye shadow to create the same illusion.

 Remember, cosmetics are the most instantaneous and temporary changes we can make to our appearance, so don’t be scared, just take an hour or two to experiment and have fun playing!


 For more make up  tips and tricks, try my  instructional  DVD 
“Bombshell: Dramatic  Make Up For The Stage, Photos And Glamourous Occasions” available here:


Wednesday, July 24, 2013

DANCERS, SELF ESTEEM AND BODY IMAGE

Attention... You Are Hot!


This is your self esteem call-to-arms: step away from your computer, and take a look in the mirror: you are smokin’ hot.


 In the act of performing onstage, dancers leave themselves vulnerable and  open to critique of their performances, their music, costume choices, and of course, their physical beings.  While audiences and other performers usually praise, there are those who can be harsh, but it’s your own inner critic that is most brutal.


 For decades, through advertising and in the media, women in general have been held to an ever-changing, ridiculously  unattainable standard of beauty that is just about impossible to achieve.

 It’s pretty twisted- the genetic wonders on display as the penultimate of feminine beauty are also primped, preened and fixed up by a legion of experts, lit and shot by pro photographers at the top of their  field, and photo-shopped within an inch of their life.

 Because of this, we all have been made to feel that we are lacking somehow… and dancers have these feelings perhaps more than any civilian woman ever could!

 We’re too fat, too thin, too old, not old enough, too dark-skinned or so white we  practically glow in the dark!

  1991: I thought I was fat and that my face was "too round'! 
Our faces are too haggy, too jowly, and too wrinkled. There’s way too much baby fat on our cheeks or not enough. Our eyes are the wrong color and shape, our noses are hooked or too short and stubby, our lips aren’t plump enough.

We have  no chin,  our necks are too short or too long,  there’s cellulite on thighs- plus our legs are too short, too thick, too hairy or knobby-kneed.  Our bellies are much  too round, too protruding and, along with our hips (which, of course are too wide) are covered in stretch marks.  Our butts are   too flat, too round , non-existent or too shelf-like. Our boobs are too big, too small, and too saggy.  Or our boob jobs didn’t turn out right!  Our thighs and upper arms are flabby, our knees are scarred, the knuckles on our fingers are too big, and our hair is the wrong color or texture.

Crazy?  You bet!

Shall I go on? I thought not.

 I don’t need to tell you that condemning yourself is neurotic, unproductive and harmful.  You already know it.  I already know it, but I do it sometimes too!  We all do. Don’t drink the Kool Aid.

 Stop it!!!

  Dancing is what makes you happy, it makes you whole, and helps you feel lovely. It’s a passion and a blessing- it’s not to be taken lightly. Some women don’t have the luxury of dance because they live in oppressive societies, or because they are infirm: gravely ill, crippled or maimed in some way, physically or emotionally damaged beyond repair.

In the many classes I teach all over the world, along with experiencing the sisterhood of dancing, I often see and hear women slighting  their abilities and disparaging their bodies.  This hurts my feelings, seeing so many people truly feel that they are lacking or not worthy.  You  are clumsy, you have two left feet, it takes you too long to learn choreographies or you can't improvise. You feel stupid and ugly.
A few months ago...before I turned 54.  I finally like how I look!

It's rare to  hear  dancers  talking about how talented they are,what a great performance they had, or  to simply mention that dancing is a  gorgeous gift that has been bestowed upon them.  

We need to change our internal conversations! 

Time marches on relentlessly,  and  though you will probably become a better dancer in the future, you’re probably never going be any hotter than you are now, right at this moment. If you don’t believe me, look at some old photos of yourself- from fifteen years ago- or from last week- any time you thought you were fat and ugly.

What the hell were you thinking…you probably could’ve ruled the world!

Give yourself some credit, cut yourself some slack, and help other women to see themselves as wonderful too. Respect your vessel- the whole, healthy body you have which makes such lovely shapes and patterns to music. You are living art!

 You are beautiful. You are.

 And yeah…you better believe it…

You are hot!   


Tuesday, August 4, 2009

YOU GIVE GREAT FACE: DANCE MAKE-UP FOR STAGE AND PHOTOS


As a performing dancer of any genre, you want your face to be not only beautiful and finished, but also expressive. You will want to look fabulous- with pretty doe eyes, luscious lips and have your best features maximized. In general, belly dance make-up should exotic and mysterious, but not garish- there’s a fine line here that is easy to cross. For work where you will be seen up close, such as private parties or outdoors in the daytime, like at a dance festival, you’ll definitely need more make-up than you would wear on the street. This can be as uncomplicated as rimming your eyes with liner or powder shadow a little darker and more heavily than usual, and using a brighter shade of lipstick. Of course, if you’re a major glamour-puss (like me!) you will also want to add a bindi or two, a medium-sized set of false eyelashes, and some body glitter.

However, if you are working on a large stage, or about to have professional photos done, wearing a little more eyeliner simply won’t cut it. The first thing you must remember about being onstage or in a photo studio is that the lights will wash out your features. You may have on a spectacular costume and be dancing beautifully, but without make-up (or with "every day" make-up) your face will appear almost blank. The basic look gone over here will enhance your features and also work well with dim lighting, the kind you may encounter while dancing in a restaurant or nightclub. For black and white photos you can really pile it on; with color photos you need a slightly more subtle approach. This look may seem heavy and almost clown-like up close, but on stage or under harsh studio lights, your face will look natural, yet intense, with your features accented.

For stage and studio work, you will definitely want to wear foundation make-up, or a combination powder/foundation, because it will make your complexion appear poreless and perfect. Sheer formulas are not good or strong enough to achieve this effect- you will need a very opaque, full-coverage type of foundation to get the desired effect. In general, you would select a foundation color by matching it as closely to your own skin tone as possible. Try foundation samples on the inside of your arm, this skin tone is very close to the color of your face. For stage work, many performers like to use a foundation that is a shade or two darker than their natural skin tone, because it makes their face appear brighter and more robust under the harsh stage lights. If you are unsure what color to pick, consult with a make-up artist at a department store cosmetics counter.

To apply your foundation, use a sponge edge or clean fingers to daub the make-up onto your face, and blend it well, making sure to extend the blending onto the sides of the cheeks, chin, and onto the neck, so you don’t have a discolored, de-markation line where the foundation ends and your natural skin tone begins. Press translucent or similarly toned powder onto your face to set the foundation, and wait a few minutes for it to set before applying any other make-up. Before applying eye make-up, a pro trick is to sprinkle a good amount of translucent powder or even baby powder on the cheeks, directly under the eyes.
This will catch any “migrating’ pigments from the eye shadow you are about to apply. When you are done with your maquillage, simply blow or brush away the excess powder for a flawless finish.

BASIC DANCE MAKE-UP FOR STAGE AND PHOTOS

#1) Cover entire eye area (lid and upper lid) with beige, white or ivory shadow.

#2) Lightly pencil in brows (with short, feathery strokes, not harsh lines) and extend outward and upwards.

#3) Accentuate the hollows at the inside corner of your eye with a light brown shadow. (This step may be eliminated if you have large eyes with big lids)


#4) Use dark brown shadow or gray in the crease of the eye, and, if you like, extend it in a sweeping wedge outwards and up at the outside corner for a cat-like slant.


#5) Smudge a "V" shape of black or dark grey shadow in outer corner of eye.


#6) Softly line under the eye in back or gray shadow. Dark blue also may be used; it makes whites of the eye appear whiter. Smudge shadow so the line is not harsh.

#7) Apply black mascara to top lashes. Brown might be ok for every day but black is much better for stage and photos. Instead of mascara, which will run if you sweat while dancing, you may wish to apply false eyelashes. Most professional dancers eschew mascara altogether and use faux lashes.

“ But wait!” I can hear your panicked cry, “I haven’t the foggiest notion of how to apply false eyelashes!”

Never fear! I was taught to apply false eyelashes by (who better?) a professional drag queen! After a simple demo, I mastered the art of faux-lash application and have never looked back. It’s easier than you might think, too.
The first things you will need to do are look at the lashes, and determine which is for the left eye, and which is for the right. Yes, eyelashes are made differently, with the smaller, shorter hairs meant for the inside corner of the eye. Next, trim the lash (at the inside end) to fit your eyes. Some of us have long, almond-shaped eyes; others have eyes that are slightly rounder in shape. False lashes are meant for everyone, so most are too long, on purpose length-wise.

After you’ve trimmed the lashes, apply a thin band of glue to the base of the false lash, and let it sit for at least 30 seconds, - more like a full minute or two, until glue is tacky. The brand of the glue, or the amount you put on the lash will determine how quickly it dries. My drag queen pal used to give me this sage advice:

“ Girl, you put the glue on your eyelash. Then you walk your ass into the kitchen, and pour yourself a nice cocktail. Wander over to your closet, open the door, and think about what stunning outfit you’re going to wear. Then you take a sip of that cocktail, and figure out what jewelry will go with your dress. …Then you take a few more sips of that cocktail, til it’s almost half gone. When you’re thinkin’ ‘bout finishing that cocktail…. And only THEN… you pick up your lash, and put it on! And, honey, repeat every step for the other side!

Cocktails or not- it was good advice. The main reason most gals have a problem with applying false eyelashes is that they try to stick the lashes on when thy are too wet, which can result in slippage, or worse- actually gluing your eyelids together!

I recommend "DUO" glue in clear/white, it’s my favorite because it holds well and is the least irritating of any brand I've used. Using clear glue, by the way, is better, because it dries invisibly. If you use the dark-toned glue, it can make mistakes look very obvious. When you are ready to apply the lash, sit it on your upper eye-lid, just above your natural lash-line. Press down lightly in the middle first, and then tap the lash down lightly towards inner and outer corners. Keep your eye closed for a moment, to let the glue take hold. And back to the rest of your make-up…

#8) Finish the eye by lining the top lid with liquid eyeliner, or smudge some black pencil over the lash-line. It will hide any visible glue. If you are using big, thick lashes, you won’t even need to do this.

#9) A nice touch is to apply pearly white or light silver shadow in the inside corners, just over the tear-ducts, to open the eyes.


#10) for more glamour in a live show, lightly sprinkle glitter just under brows, or apply with a finger or paint on with eyeliner sealer to make the entire area sparkly, being careful not to get any INTO your eye. Opt against the glitter if you are doing a photo session. On film it doesn’t appear sparkly, just grainy.

#11) Rhinestones or sequins may be glued onto outer corner of eye for a flashy fantasy effect. This looks great onstage, but in photos it may appear as a white blur that will look like a scratch on the negative, so it's not recommended for pictures. To glue the stones or sequins on, simply apply a tiny dot of lash glue to the back of the decoration and stick it on where you want it.

12) For bee-stung, "kissable" lips, apply lipstick and blot with a tissue, then draw an outline with pencil just over the lip-line on your lower lip, to make it appear fuller. A small dot of white or gold eye shadow in the center of the lower lip makes it look even fuller. On stage for a natural look, use, beige or pinkish- nude lipstick outlined with mauve, purple or brown liner. Up close, it will look weird, but it looks like plump, kissable lips from far away.


13) Contour just under cheekbones and jaw line with light brown shadow or blush, blend well. Apply a pinkish color on the "apples" of your cheeks for color, especially on stage. To find the “apple”, smile at yourself in the mirror. Start with a minimal amount of color, and build from there.


14) Powder your face to set make up, either with a puff or cotton ball, and you're good to go! Make sure you bring your make up bag along for touch ups.

15) Remember to take off ALL your make-up before going to sleep!


PHOTO BY DON SPIRO